Programming #
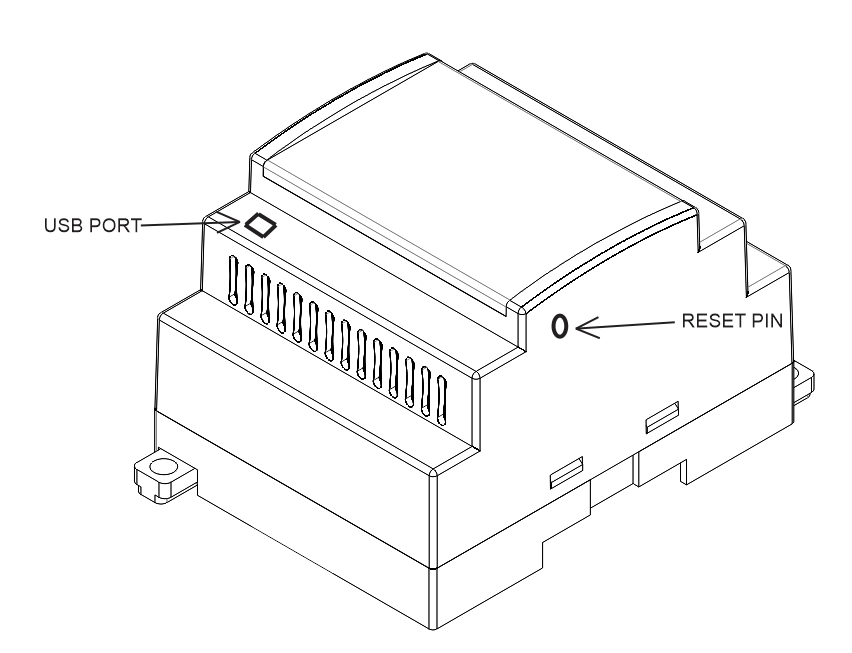
NORVI-CEMA-M1 has a mini USB Port for serial connection with the SoC for programming. Any ATMEGA 32-supported programming IDE can be used to program the controller. Follow this Guide to programming NORVI ATMEGA 32 Controllers with Arduino IDE. Make sure to press and hold the reset button as you compile the code, then release it
promptly when starting to upload the code.
SoC: Arduino Micro ATMEGA 32
Programming Port: USB UART
Digital Inputs #
Wiring Digital Inputs #
The digital inputs of NORVI-CEMA-M1 can be configured as both a Sink and Source connection. The inverse of the Digital Input polar should be supplied to the common terminal.

Programming Digital Inputs #
Reading the relevant GPIO of ATMEGA 32 gives the value of the Digital Input. When the inputs are in the OFF state the GPIO goes HIGH, and when the input is in the ON stage GPIO goes LOW. Refer to the GPIO allocation table in the Datasheet for the digital input GPIO.
#include <Wire.h>
#include <Adafruit_GFX.h>
#include <Adafruit_SSD1306.h>

#define IN1 11
#define IN2 7
#define IN3 A5
#define IN4 A4
#define IN5 A3
#define IN6 A2
#define IN7 A1
#define IN8 A0

int analog_threshold = 512;

void setup() {
  Serial.begin(9600);
  pinMode(IN1, INPUT);
  pinMode(IN2, INPUT);
  pinMode(IN3, INPUT);
  pinMode(IN4, INPUT);
  pinMode(IN5, INPUT);
  pinMode(IN6, INPUT);
  pinMode(IN7, INPUT);
  pinMode(IN8, INPUT); }

void loop() {
  int in7 = digitalRead(IN1);
  int in8 = digitalRead(IN2);
  int in3 = analogRead(IN3);
  int in4 = analogRead(IN4);
  int in5 = analogRead(IN5);
  int in6 = analogRead(IN6);
  int in1 = analogRead(IN7);
  int in2 = analogRead(IN8);

  Serial.print("Input values: ");
  Serial.print(in1 == HIGH ? "1" : "0");
  // Serial.print(" ");
  Serial.println(in2 == HIGH ? "1" : "0");
  // Serial.print(" ");
  Serial.print(in3 >= analog_threshold ? "1" : "0");
  // Serial.print(" ");
  Serial.print(in4 >= analog_threshold ? "1" : "0");
  // Serial.print(" ");
  Serial.print(in5 >= analog_threshold ? "1" : "0");
  // Serial.print(" ");
  Serial.print(in6 >= analog_threshold ? "1" : "0");
  //  Serial.print(" ");
  Serial.print(in7 >= analog_threshold ? "1" : "0");
  // Serial.print(" ");
  Serial.print(in8 >= analog_threshold ? "1" : "0");
  delay(1000); // Adjust the delay as per your requirement
}
Relay / Transistor Output #
Wiring Relay Outputs #

Wiring Transistor Outputs #

Programming Relay/ Transistor Outputs #
Reading the relevant GPIO of ESP32 gives the value of the Relay/ Transistor Output. Refer to the GPIO allocation table in the Datasheet for the Relay/ Transistor Output GPIO.
#include <Adafruit_SSD1306.h>
#define O1 4
#define O2 12
#define O3 6
#define O4 8
#define O5 9
#define O6 10
#define O7 5  // PWM trans
#define O8 13 // PWM trans

bool out[8] = {};
byte pwm1 = 0, pwm2 = 0;
int8_t selec = 0;

Adafruit_SSD1306 display(128, 64, &Wire, 3);

void setup() {
  pinMode(O1, OUTPUT);
  pinMode(O2, OUTPUT);
  pinMode(O3, OUTPUT);
  pinMode(O4, OUTPUT);
  pinMode(O5, OUTPUT);
  pinMode(O6, OUTPUT);
  pinMode(O7, OUTPUT);
  pinMode(O8, OUTPUT);

  digitalWrite(O1, LOW);
  digitalWrite(O2, LOW);
  digitalWrite(O3, LOW);
  digitalWrite(O4, LOW);
  digitalWrite(O5, LOW);
  digitalWrite(O6, LOW);
  digitalWrite(O7, LOW);
  digitalWrite(O8, LOW);
  display.begin(SSD1306_SWITCHCAPVCC, 0x3C);
  display.clearDisplay();
  display.display();
}

void loop() {
  runCheck();
}

void runCheck() {
  // Your output control logic here
}

void display1() {
  // Display logic for Page 1
}

void display2() {
  // Display logic for Page 2
}

ISR(TIMER1_COMPA_vect) {
  // Timer interrupt logic
}
Built-in OLED Display #
| Display driver | SSD1306 |
| Communication | I2C |
| Module Address | 0x3C |
| Resolution | 128 x 64 |
Refer to the GPIO allocation table in the datasheet for the I2C GPIO of the OLED Display.
Library supported by the Adafruit_SSD0306 Library.
Wire.begin (SDA, SCL); is required to initialize I2C on correct pins.
Programming OLED Display #
#include <Wire.h>
#include <Adafruit_GFX.h>
#include <Adafruit_SSD1306.h>

#define SCREEN_WIDTH 128 // OLED display width, in pixels
#define SCREEN_HEIGHT 64 // OLED display height, in pixels
#define OLED_RESET 3

Adafruit_SSD1306 display(SCREEN_WIDTH, SCREEN_HEIGHT, &Wire, OLED_RESET);

void setup() {
  display.begin(SSD1306_SWITCHCAPVCC, 0x3C);
  display.clearDisplay();
  display.setTextSize(0);
  display.setCursor(0, 0);
  display.print(" CEMA Test Program");
  display.display();
  delay(2000);
  Serial.begin(9600);
}

void loop() {
  // Your loop code here
}
Built-in Buttons #
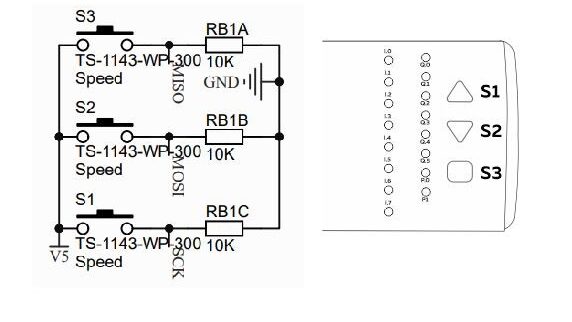
| Button 1 Pin | SCK |
| Button 2 Pin | MOSI |
| Button 3 Pin | MISO |

Programming Buttons #
#define b1 SCK
#define b2 MOSI
#define b3 MISO

void setup() {
  pinMode(b1, INPUT);
  pinMode(b2, INPUT);
  pinMode(b3, INPUT);
}

void loop() {
  // Your loop code here
}
USB and Reset #


