Setting up environment #
Setting up the environment for Arduino LVGL Examples #
- Installing SquareLine Studio
- Adding supported libraries
Initiating a Project with SquareLine Studio #
- Create a project
- Pre-requisites.
- Compile and Upload.

Setting up environment #
For detailed instructions on,
Installing the Arduino IDE and adding the board, please refer to the Getting Started with NORVI ESP32 HMI document. Getting Started with NORVI ESP32 HMI provides step-by-step guidance on the setup process and Arduino Graphics Library Examples.
Setting up the environment for Arduino LVGL Examples, please refer to the LVGL Example Guide for NORVI ESP32 HMI document. LVGL Example Guide for NORVI ESP32 HMI provides step-by-step guidance on the setup process of LVGL Library examples.
Setting up the environment for SquareLine Studio #
Installing SquareLine Studio #
Start by downloading the software from the official SquareLine Studio website, and selecting the version compatible with the operating system. Once the download is complete, proceed with the installation process by executing the downloaded file.
After a successful installation, open the SquareLine Studio software. A pop-up window will appear, where to select “Create/Arduino” to initiate the Arduino project.

To customize settings, navigate to the options provided below. When choosing the LVGL version, please refer to the downloaded library within Arduino.

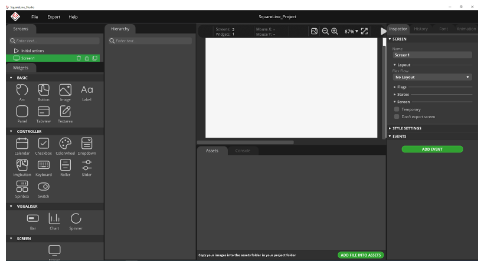
After confirming the LVGL version, proceed by selecting “Create” located in the lower right corner, which will unveil the following interface.

There is a series of widgets organized in the left-hand widget column. These selections include basic widgets (ARC, buttons, image, label…), control widgets (calendar, keyboard, slider…), and visualization widgets (bars, charts, and spinner). Additionally, a category dedicated to screens can be found.

Adding supported libraries #
Download the LVGL Demo folder for the essential libraries, and files from the link.
Copy the libraries from the downloaded LVGL Demo folder into the Arduino/library folder.
If there is already a downloaded library file, please replace it with this library file.

Initiating a Project with SquareLine Studio #
Create a project #
Create a project with SquareLine Studio to seamlessly control an LED light. The project has to be configured to activate the LED when the “ON” button is pressed and deactivate it when the “OFF” button is selected.
- Incorporate the buttons from the widgets bar. Utilize the Inspector Bar to configure the button’s style settings, tailoring its appearance to suit your design preferences.

- Furthermore, leverage the Inspector Bar to add events to the button. When defining actions for events in SquareLine Studio, it is important to choose actions that align with the purpose of the event. In the context of LED on and off, “call function” must be selected.

- Incorporate the labels from the widgets bar. Utilize the Inspector Bar to configure the test that should be included in the label and to configure the label’s style settings, tailoring its appearance to suit your design preferences.


- It should incorporate custom fonts when adding labels within SquareLine Studio.
- Download a preferred font and seamlessly integrate it into the project by utilizing the “ADD FILE INTO ASSETS” option located at the bottom of the software interface.
- Craft a font to your project’s needs by navigating to the ‘font menu’ located in the top right corner of SquareLine Studio.
- Select the desired size, allowing for meticulous customization of the font to suit the project’s requirements.

- Then the font can be selected when changing the label settings.

- Make a button for the “off” state, complementing the previously configured “on” state. Then the entire project comes together seamlessly.

- Create the new folder in any location on your PC and rename it.
- Select the File/Project Settings and make the changes in the pop-up window. Browse, the Project Export Root, and UI Files Export Path and select the created SQ folder. After making the changes, proceed by selecting “APPLY CHANGES” located in the lower right corner.

Then select File/Save to save the project file and Export/Export UI Files to export the project.


Pre-requisites. #
Copy the ESP32_Display_Squareline_button_Demo folder from the downloaded LVGL Demo/NORVI Squareline demo folder and paste it to the location of the created SQ project folder.

From the ESP32_Display_Squareline_button_Demo folder in the location of the created SQ project folder, remove all existing files without the ESP32_Display_Squareline_button_Demo.ino file and the touch.h file.

Copy all the files including the insides of the folders in the created SQ project folder and paste them to the ESP32_Display_Squareline_button_Demo folder in the SQ project folder.

Open ui_Screen1.c remove “. . /” and save. If the project contains images and fonts, do the same for those files.

Since this project controls an LED, the code must have some modifications. Because of the function called when creating the project.
For that, open the ESP32_Display_Squareline_button_Demo.ino file in the SQ project folder.
Then select the ui_events.c and copy the highlighted part.

Replace it with the highlighted part in the main code, (before the void setup() function).

Then add the below coding part as shown in the figure.
void button_on(lv_event_t * e);
{
  writeOutput(GPIO5, 1);
  writeOutput(GPIO6, 1);
  writeOutput(GPIO7, 1);
  writeOutput(GPIO8, 1);
}
void button_off(lv_event_t * e);
{
  writeOutput(GPIO5, 0);
  writeOutput(GPIO6, 0);
  writeOutput(GPIO7, 0);
  writeOutput(GPIO8, 0);
}
Comment the complete code of the ui_events.c.

Choose the chip and settings according to the chip as shown below.

Compile and Upload. #
Check the pin configuration of the program. After compiling and uploading the program, the User interface of the NORVI HMI should be as below.
Find the complete example program from here.
- On state

- Off state


